Need a corpse but don't want to spend $100 or more to get one?
Let's build one ourselves!
Here is how I turned my plastic blow mold "blucky" skeleton into a expensive looking corpse!
And yes I did use a Corpsing Kit from www.gore-galore.com.
This includes everything you will need (except what you are corpsing)1/2 gal. of flesh colored latex, batting, paint brush, gloves, instructions, and hair. You can purchase on the internet separately regular colored latex and batting but why spend more $ and time on the internet?
Here is a list of items you will need......
1 plastic blow mold "blucky" skeleton
1 "corpse kit" from Gore-Galore
1 large sheet of plastic or a large garbage bag
1 can of "gel" wood stain, I like the cherry color
Paper Towels or old rags
Exacto Knife
Foil
Masking Tape
Hot Glue Gun & Glue Sticks
8 inch piece of 1" PVC
3 1/2" drywall screw
Small bowl
2 cheap paint brushes
Before we start let me say to PLEASE BE CAREFUL when using a knife and cutting any part of the "blucky" some parts are really thin plastic while others are really thick. My point is that you will be cutting along and hit a spot that is hard to cut, that spot will give way and suddenly the plastic will be real thin and the knife will come at you or whatever direction you are cutting in at a 100 mph! You can slice your finger off real quick! (Not the kind of prop you want, at least not for this project)
*BE SURE TO ALWAYS CUT AWAY FROM YOU*
Ok, now that I got that out of the way, lets get started......
First of all pop off the head of your blucky.
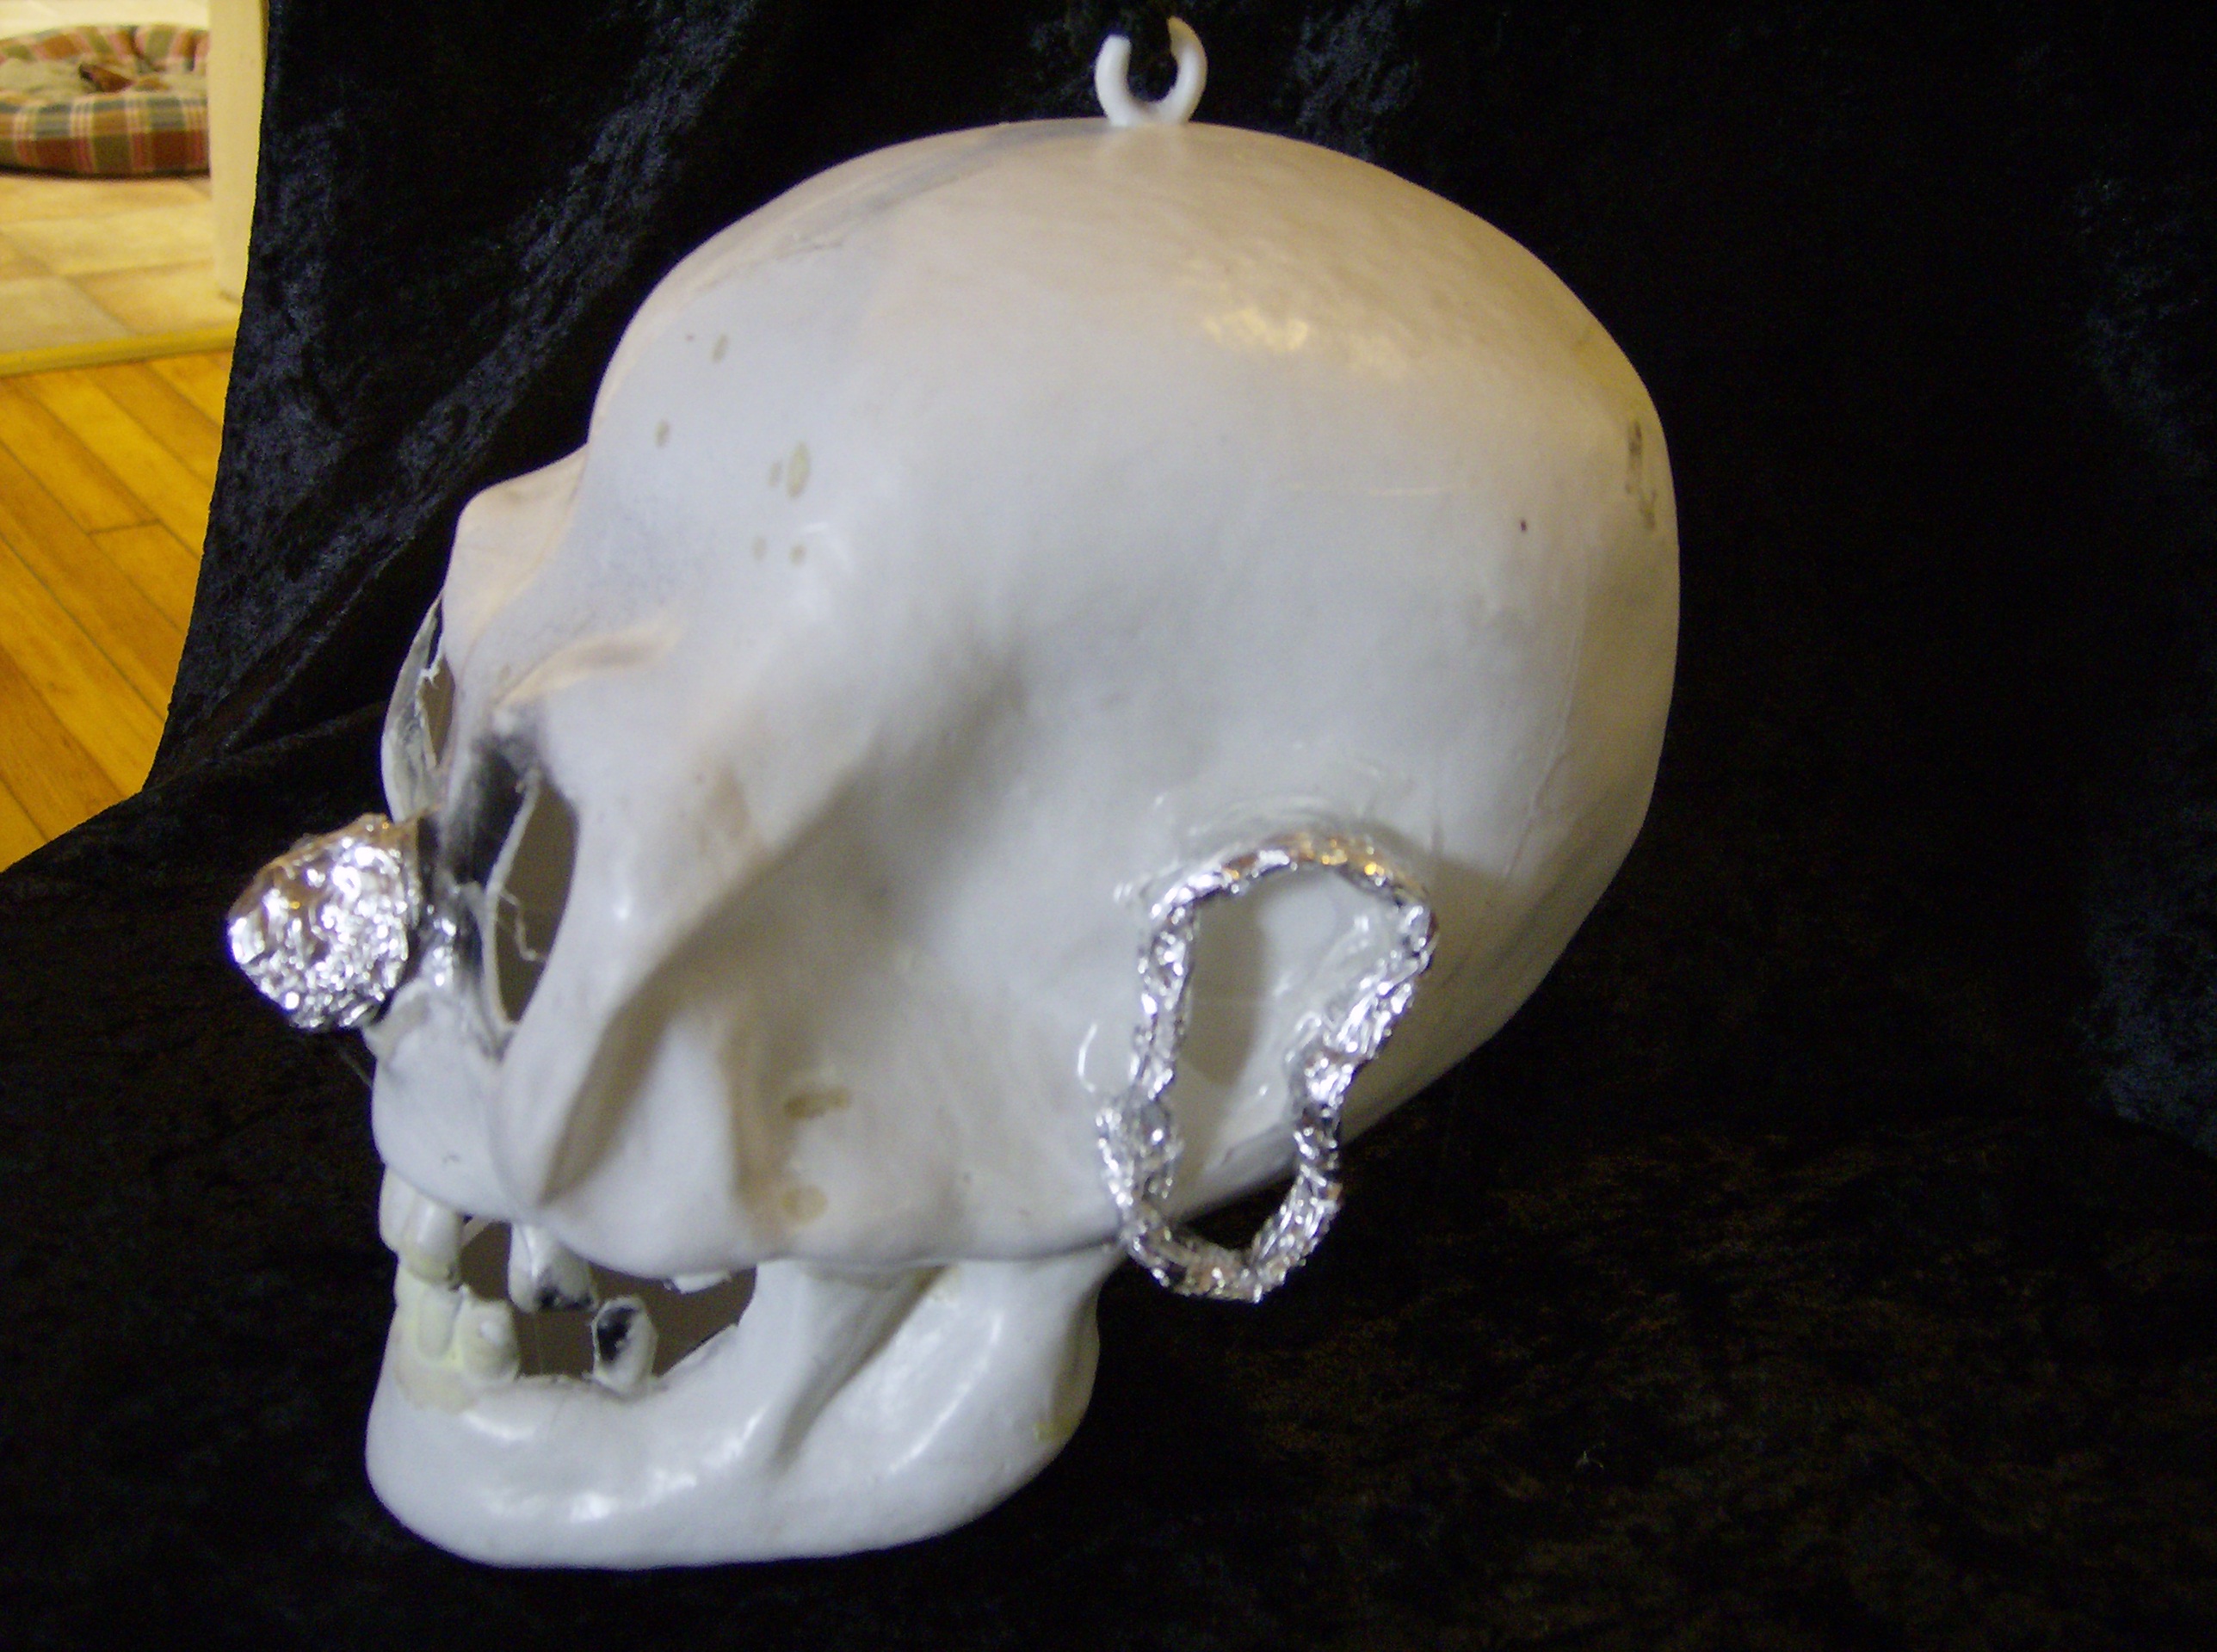
Now using a exacto knife cut out the eyes (if you are planning on adding eyes, cut round circles not the odd shape blucky has), then cut out the spaces inbetween the teeth, go ahead and take out some teeth too!
Next, rip off a 6" sheet of foil and then cut in half to make 2 6"x6" pieces. Roll each one up tightly then, mold into a ear shape(see picture). Now take your hot glue gun and glue the "ear" onto the blucky about where your ear would be on the skull. Next, rip off another small piece of foil and wad up into a small end of nose piece(see picture) and hot glue into the nose. This will give you a more defined facial look, you can leave it out if you wish. If you are planning on adding eyeballs of some kind when your "blucky" is finished, cut out a hole about 2"x2" on the lower back part of the skull. When you have completed this, set the skull aside for later.
Take off the lower arm bones, hands, the lower leg bones and the feet.
On the lower arm bones you can see how they have an indentation in the middle where real bones are seperated so, cut out the center and tape each section seperately, closing and pulling together the two open ends (see picture). When finished set aside and do the same thing to the lower leg bones.
Now with the hands cut a section out between each finger, don't be afraid to cut out to much remember you want them real thin to look boney, and when we put the "corpsing" on them it will make the fingers thicker. And once again tape up each finger indiviually from the base all the way to the tip. When completed do the same to the feet!
*If your "blucky" comes with two either left or right feet or hands, not a problem. After you cut the sections out between the fingers or toes put the two hands or feet together and cut the big toe (or thumb) lower, and then the outer ones gradually shorter.*
Pull apart the chest and the pelvic section. Take the chest section and if you would like some bones showing through ripped or fallen off corpsed skin in sections, with the exacto knife cut out sections in between the ribs, very carefully. Now keep in mind you don't have to cut out sections in between each rib only where you want the bones to be seen, this will save you a lot of work! And set aside.
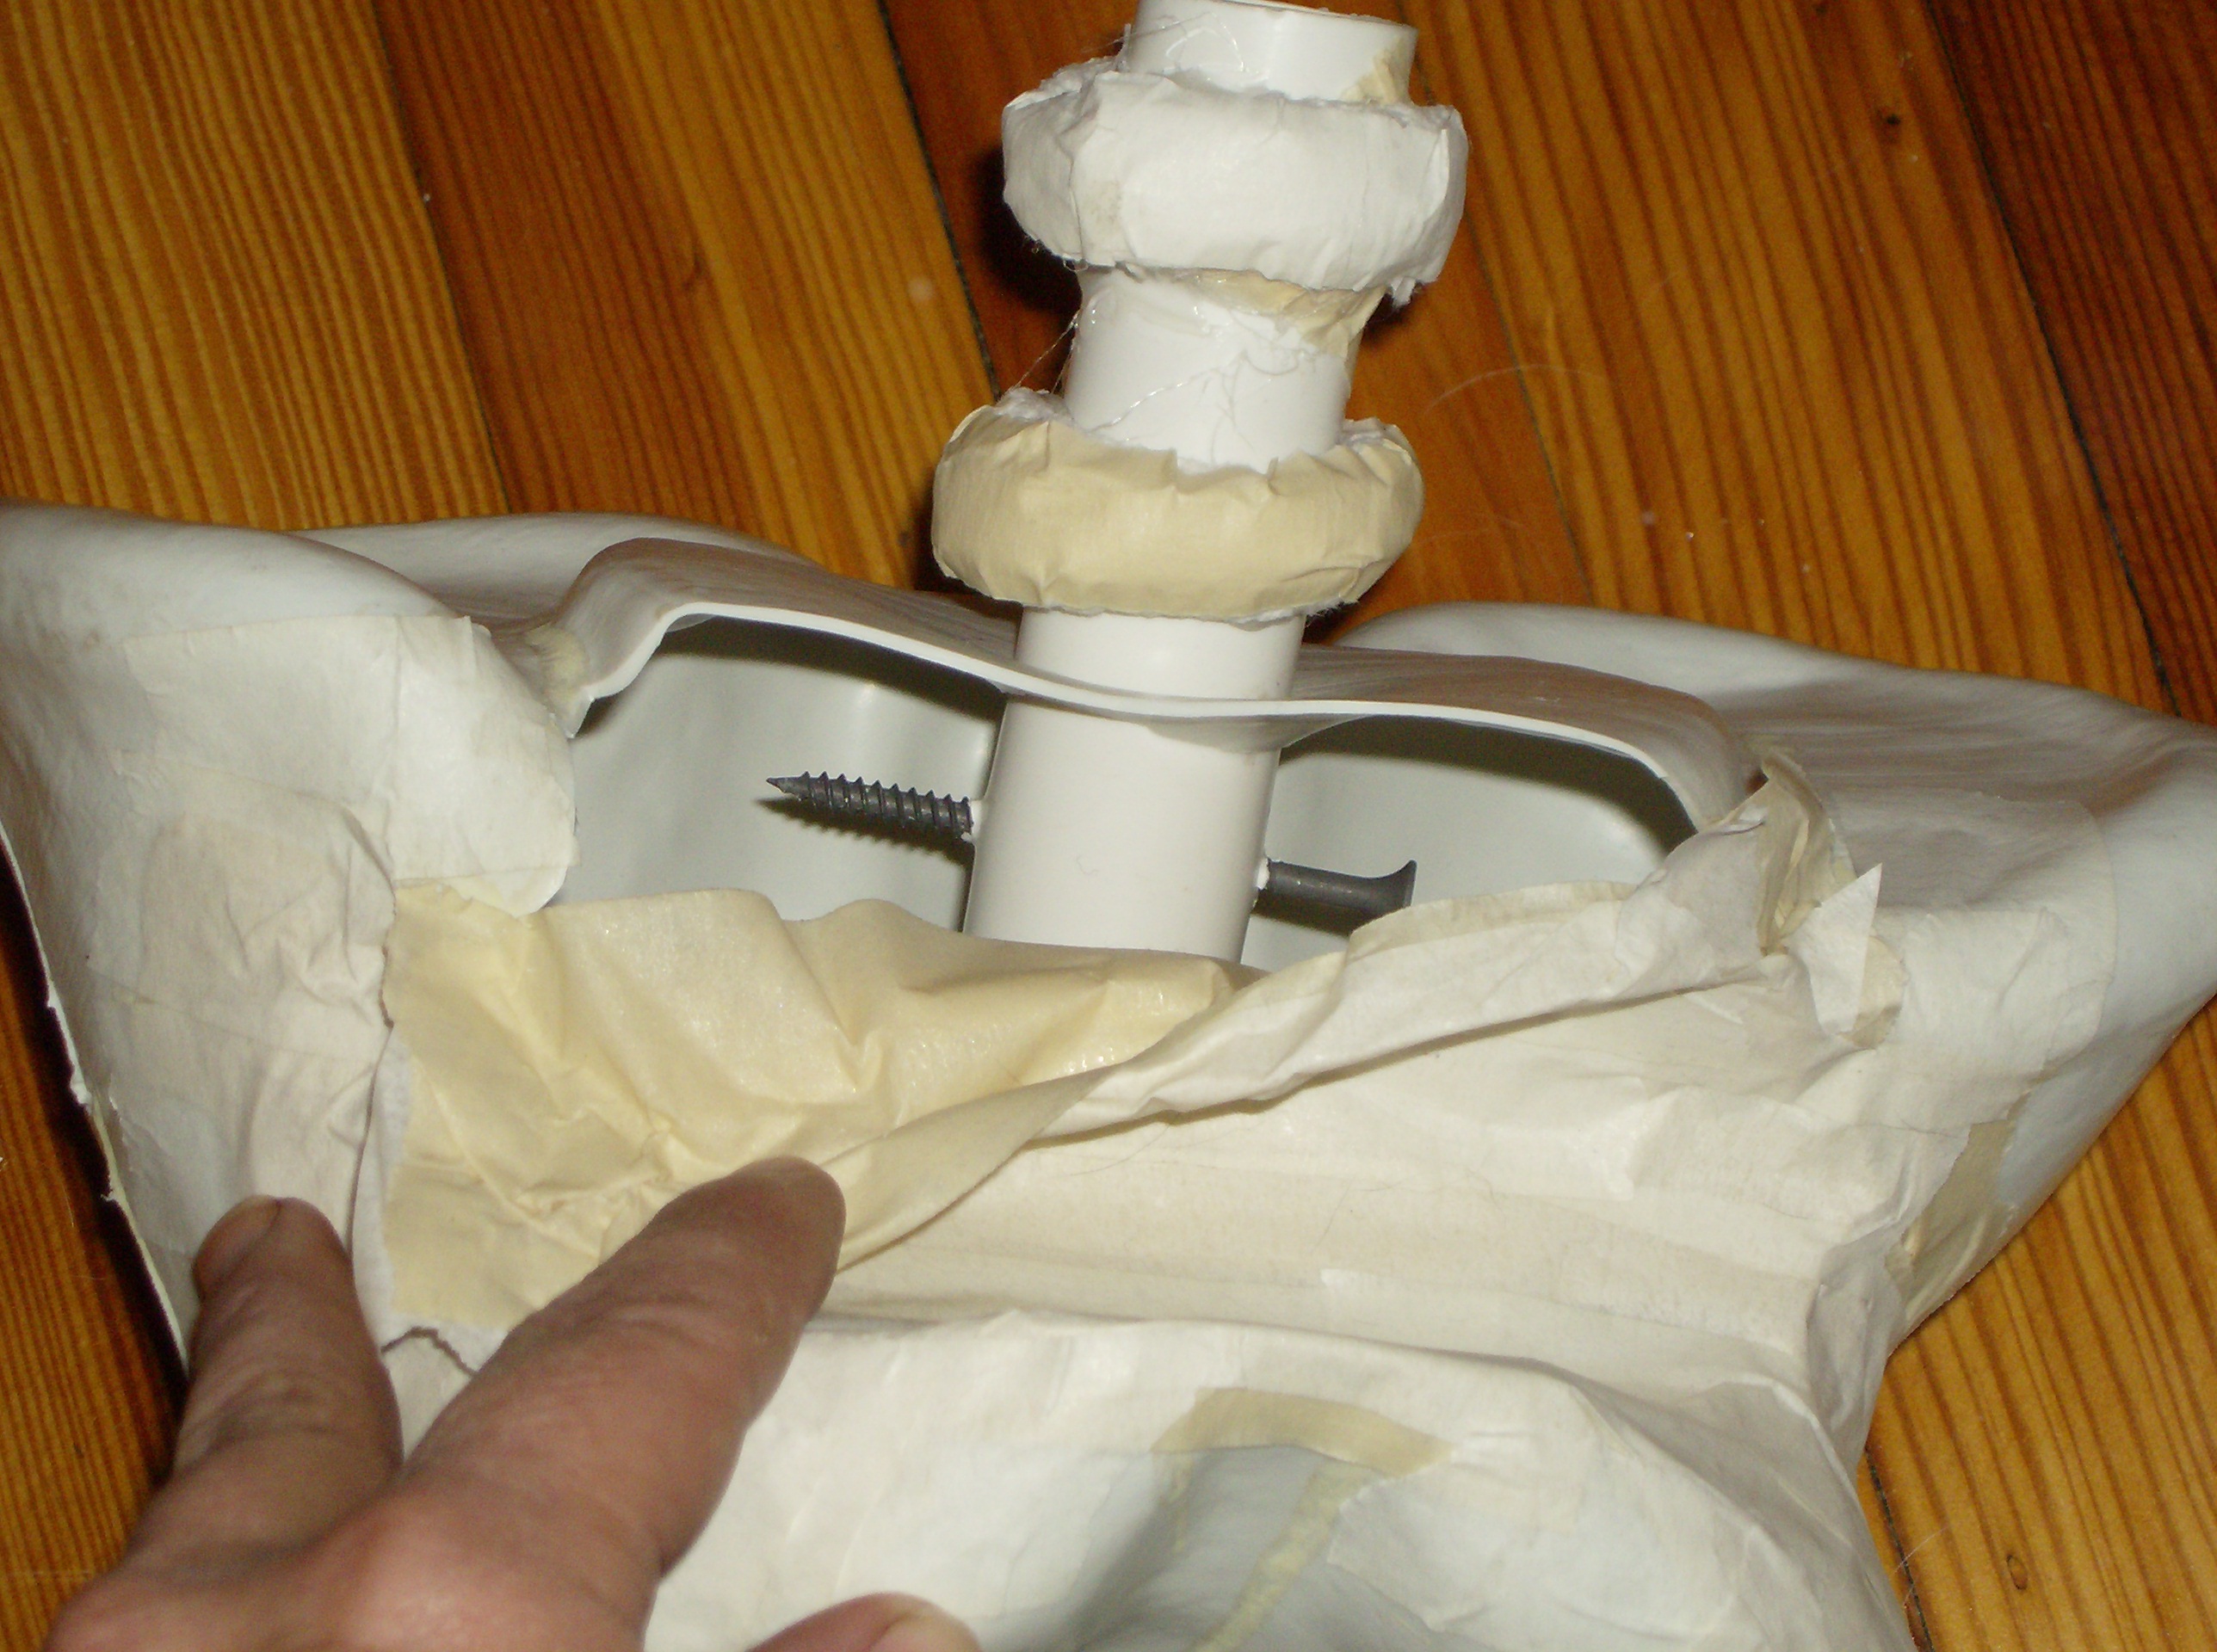
As for the pelvis, if you hold the piece so you are looking at it from the side, you'll see that the front of it is sticking way out and when your skeleton is assembled together this piece unnaturally sticks out so, cut off the front section (see picture). Now, while we have this section open take the piece of pvc and hold it in the middle of the hole on the top (where the chest section pops into place) with a marker trace around the outside of the pvc. Cut out the circle and then push the pvc into the hole. Take the 3" screw and about a 1/2" from the bottom of the pvc screw it into pvc from one side through the other(so you have equal amount of the screw sticking out from each side) this will prevent the pvc from coming out of the pelvic piece. Take a hot glue gun and put a bead of hot glue around the top and the bottom of the pelvic piece against the pvc and let cool. Take masking tape and cover the open area.
Now we will make a couple of vertabre pieces for the pvc piece to blend it in.
When the hot glue is cool, take a couple of paper towels and twist or roll them together, on the pelvic piece about 1 inch up on the pvc wrap the paper towel tightly around into a ring and secure it with masking tape and hot glue. About another inch up repeat this process.
Now take your chest piece and where it connects to the pelvic piece place into the open pvc end. Lift up a little bit to squirt a bunch of hot glue into the center of the pvc. When cool add a thick bead of hot glue on the outside where the pvc and pelvic piece meet.
When the hot glue has all cooled down, reassemble the skeleton back together.
If you are going to add "eyes" to your corpse now is the time to decide if you are going to be adding them before you corpse or after. If you do it before you just have to be careful not to get the gel stain on them.
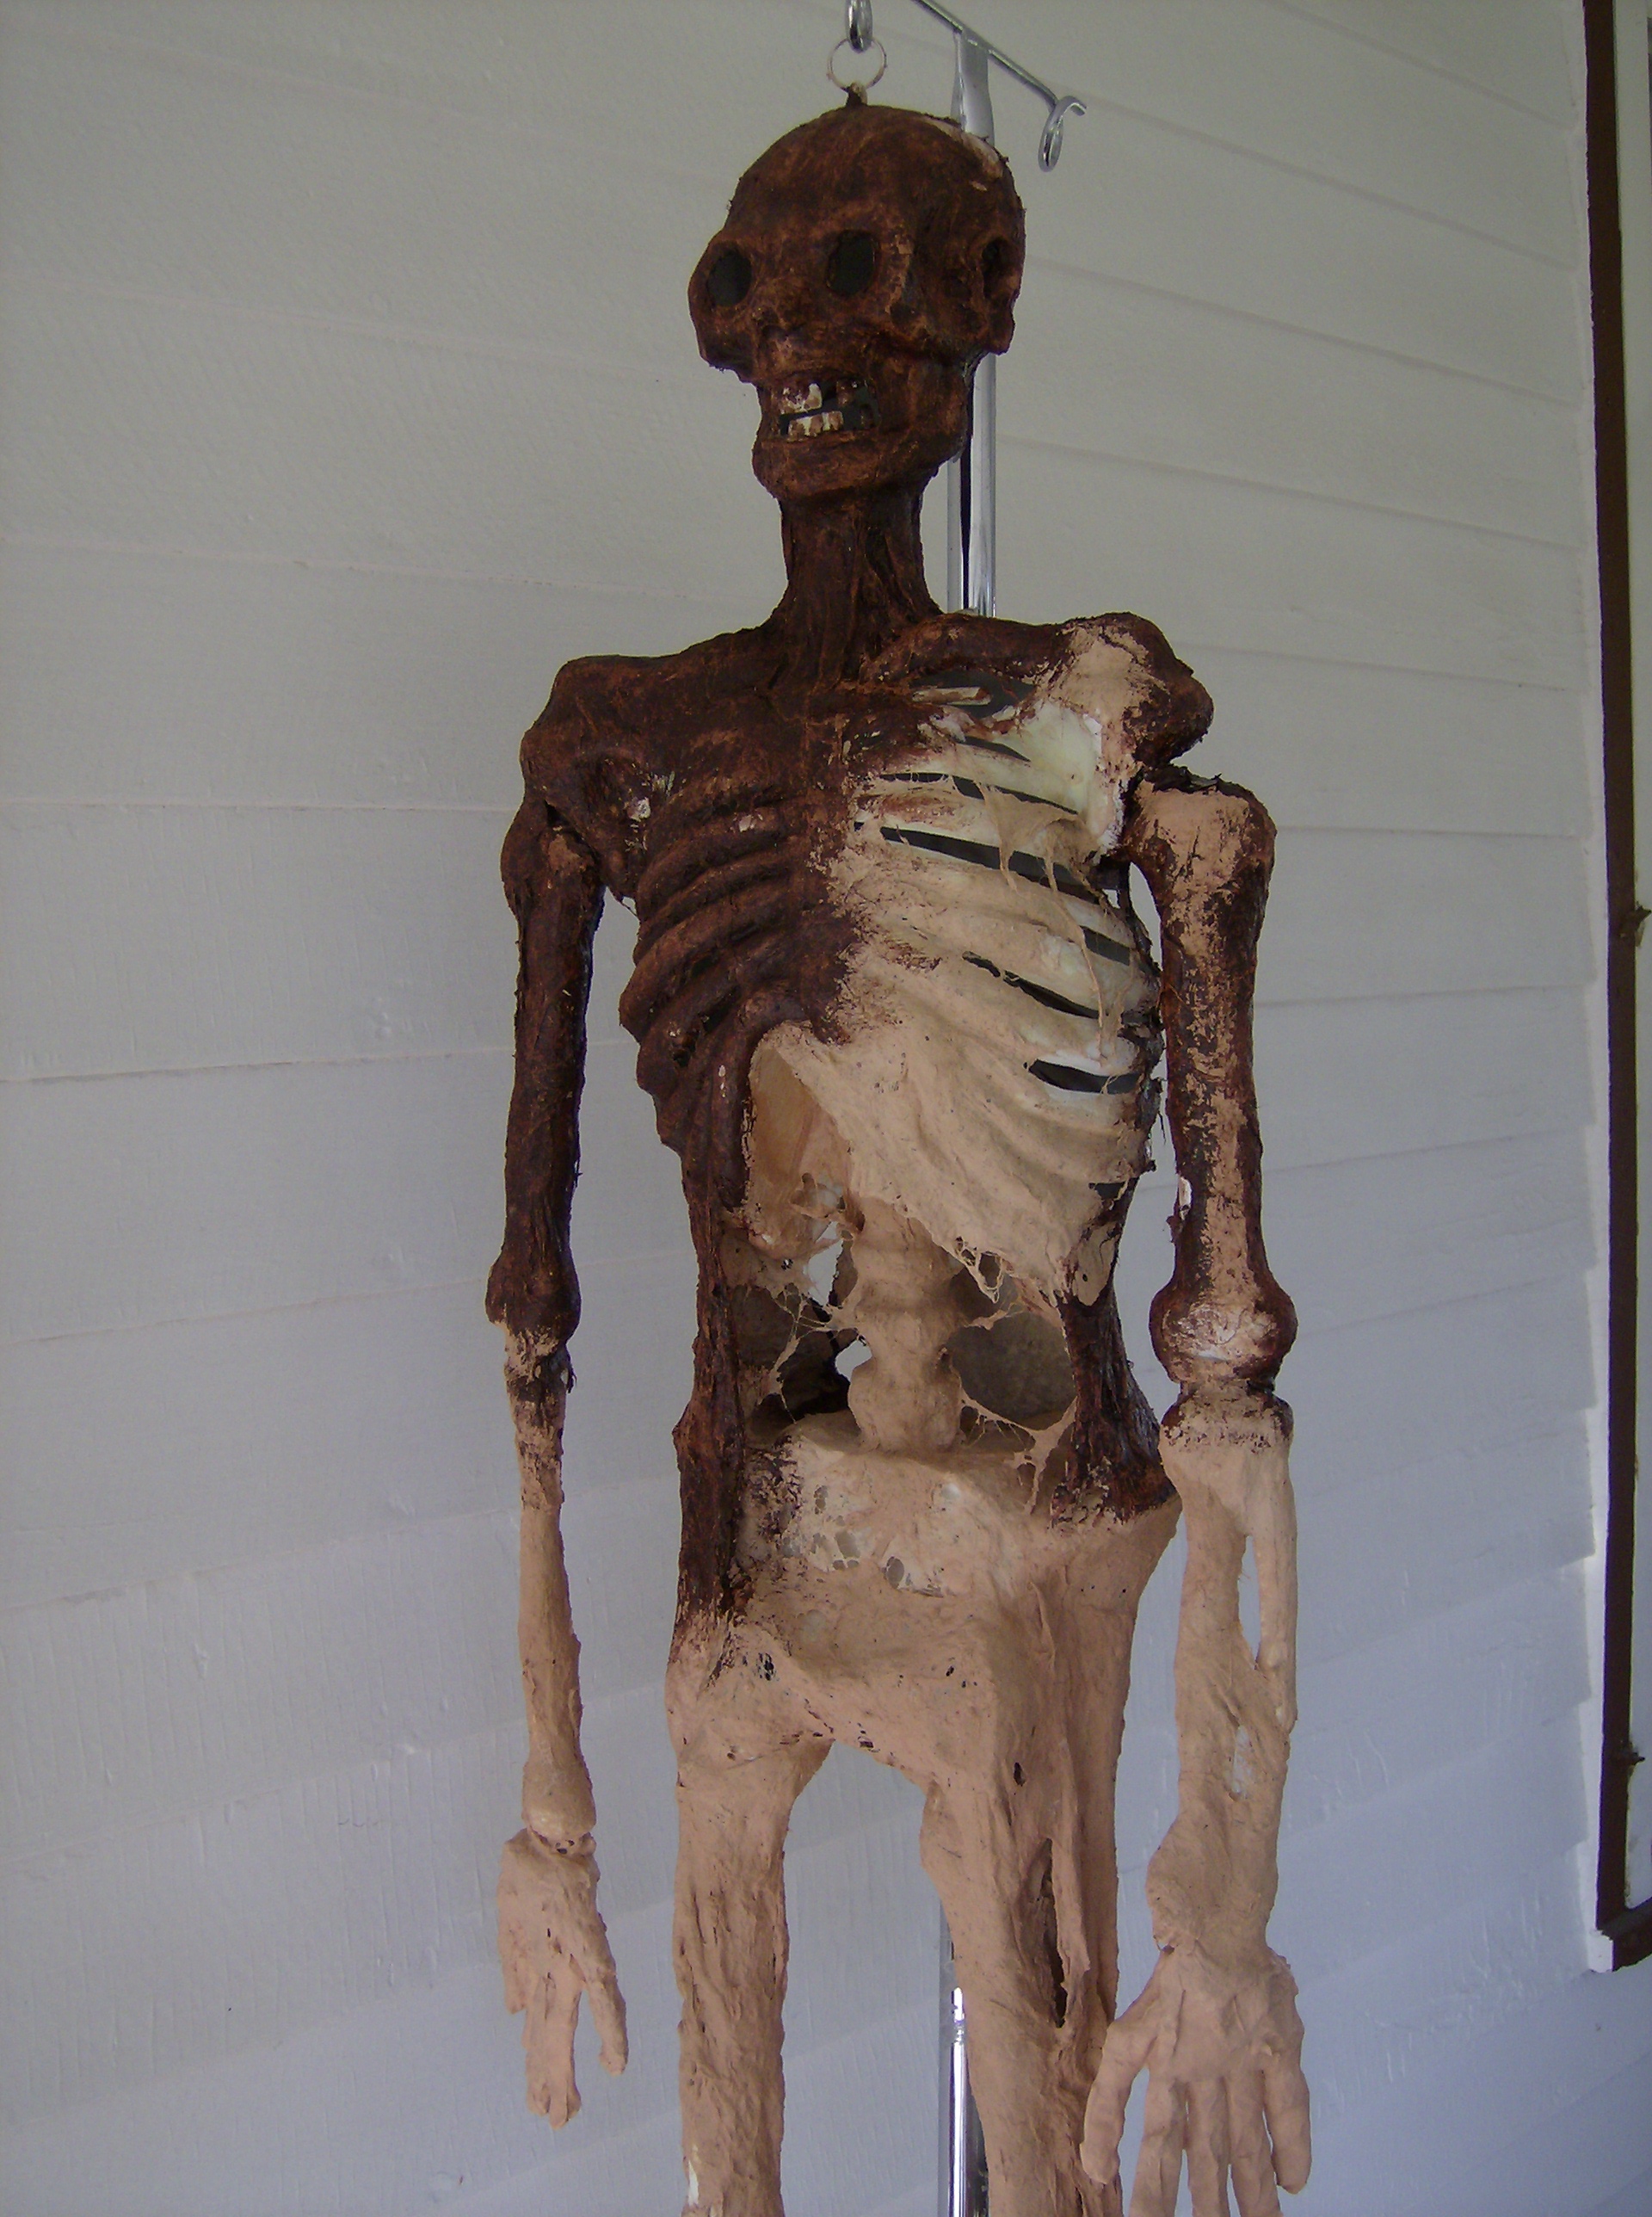
Now your "blucky" is ready to corpse!
The one thing about corpsing is that there really isn't a right or wrong way to do it. It's all about what you think will look good and how you want your "blucky" to look. Every corpse is different, some have bones showing, some don't, you can fold the arms as if your corpse has been laid to rest or have the hands stretching upwards or outwards, had just crawled out of a grave or ready to chase someone down. Whatever character or mood your corpse has will be unique, which makes it addicting to keep making more!
OK, on to the corpsing!
Now that your "blucky" is ready to corpse you will need to either lay a large piece of plastic on the floor or use it to cover a table where you will be corpsing at. You will also need to have an area covered with plastic where you are going to be applying the latex to the batting as latex will get all over.
Now open your corpsing kit, you will need the paint brush, gloves and batting (I keep the batting in the plastic bag so that no latex accidently gets onto it). Take the 1/2 gallon of latex and shake for about 30 seconds. Then pour about 1/2 to 1 cup latex into your small bowl.
When you start to corpse you can begin on any area you wish but, I usually start from the head down. I do this because it is easier to make larger sections of "skin" hanging down from one area to another. Keep in mind you don't have to do all your corpsing in one session you can apply wet pieces to dry ones. I find it a lot easier to make the skin pieces form the pelvic section to the legs or the stomach area a lot easier if all in one large piece at one time.
If you want the large area "wrinkled up" make many folds and creases.
Rip off a section of the batting, you may want to make it thinner, just pull apart into 2 pieces (this helps to use less latex). Place on the plastic covered area you have prepared to work on and using the paint brush apply the latex to the batting. It will stick and be messy. It will help if you make sure to have plenty of latex on the brush and start from the outer edge to the middle. Once you get the batting all wet with the latex, with a tapping motion "tap" the bristles down ito the batting continuously all over the whole area. This will force the latex into the batting making sure it gets wet all the way through.
When you corpse the neck, be sure NOT to have the "skin" go from the front of the jaw down to the collar bone! That will give your corpse a "turkey" look.
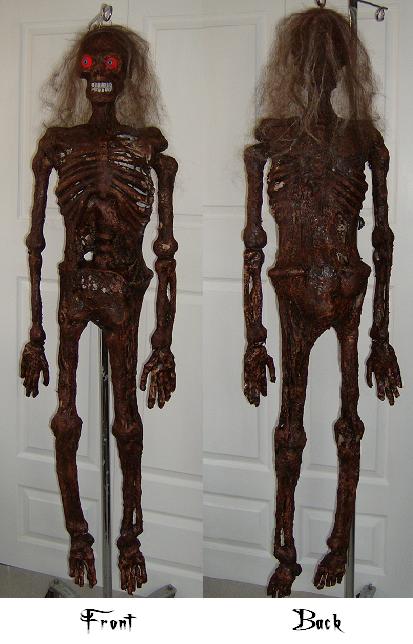
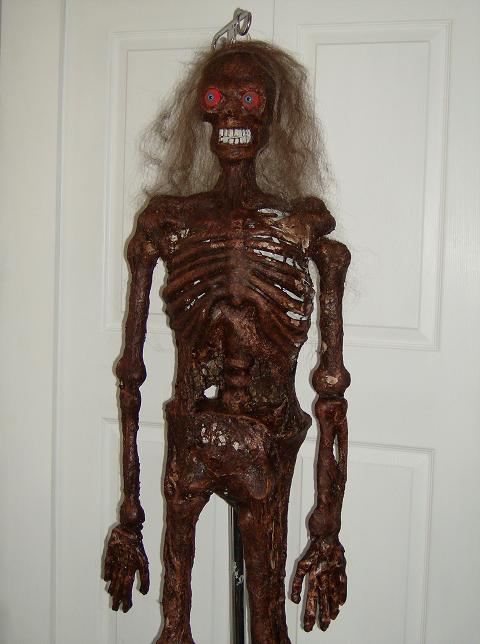
After you have "finished" corpsing and have your "blucky" looking the way you like, let him dry for a couple of days before staining him.
To stain your "blucky" you will need the gel stain, paint brush, latex gloves, many paper towels and/or rags. And don't forget to once again lay down plastic where you will be working! For Staining working outside works best, if you are not able to make sure you work in a well ventalated room and are able to have the windows open.
Staining is pretty easy I start in sections (your color will not be affected if it dries in some spots while you are working) just dip your paint brush into the gel stain and brush on, to get into all the little creases and crevises tap the bristles into the area. Then using the papertowels wipe off. If your towel is getting staturated go back over the area with a new one to make sure all the high spots get wiped off and are a lighter color. Repeat continuously until your "blucky" is the way you like it, and let him once again dry for a few days, preferably in the garage as he will be a little stinky from the stain.
When the stain has been allowed to dry bring "blucky" inside. Grab your hot glue gun, the hair that comes with your corpsing kit (or you can use the special effect hair in the make up section of your favorite Halloween store, or a Halloween wig hair works too.)
Either using small dots with the hot glue onto the skull of your "blucky" or a small line of hot glue apply small sections of hair. If you can see the areas hot glue through the hair, grab some adhesive spray (available at you local craft store) and spray onto the hair you have already applied and then add some more hair on top where you sprayed, this will hide any spots you don't want seen. Now all you have left to do is add eyeballs if you wish and if you would like, you can use craft paint to paint the teeth if you got any stain on them!
And there you go,
Your very own corpse that you didn't have to spend $100's of dollars on,
and you can brag about how "you" made it!


 Need a corpse but don't want to spend $100 or more to get one?
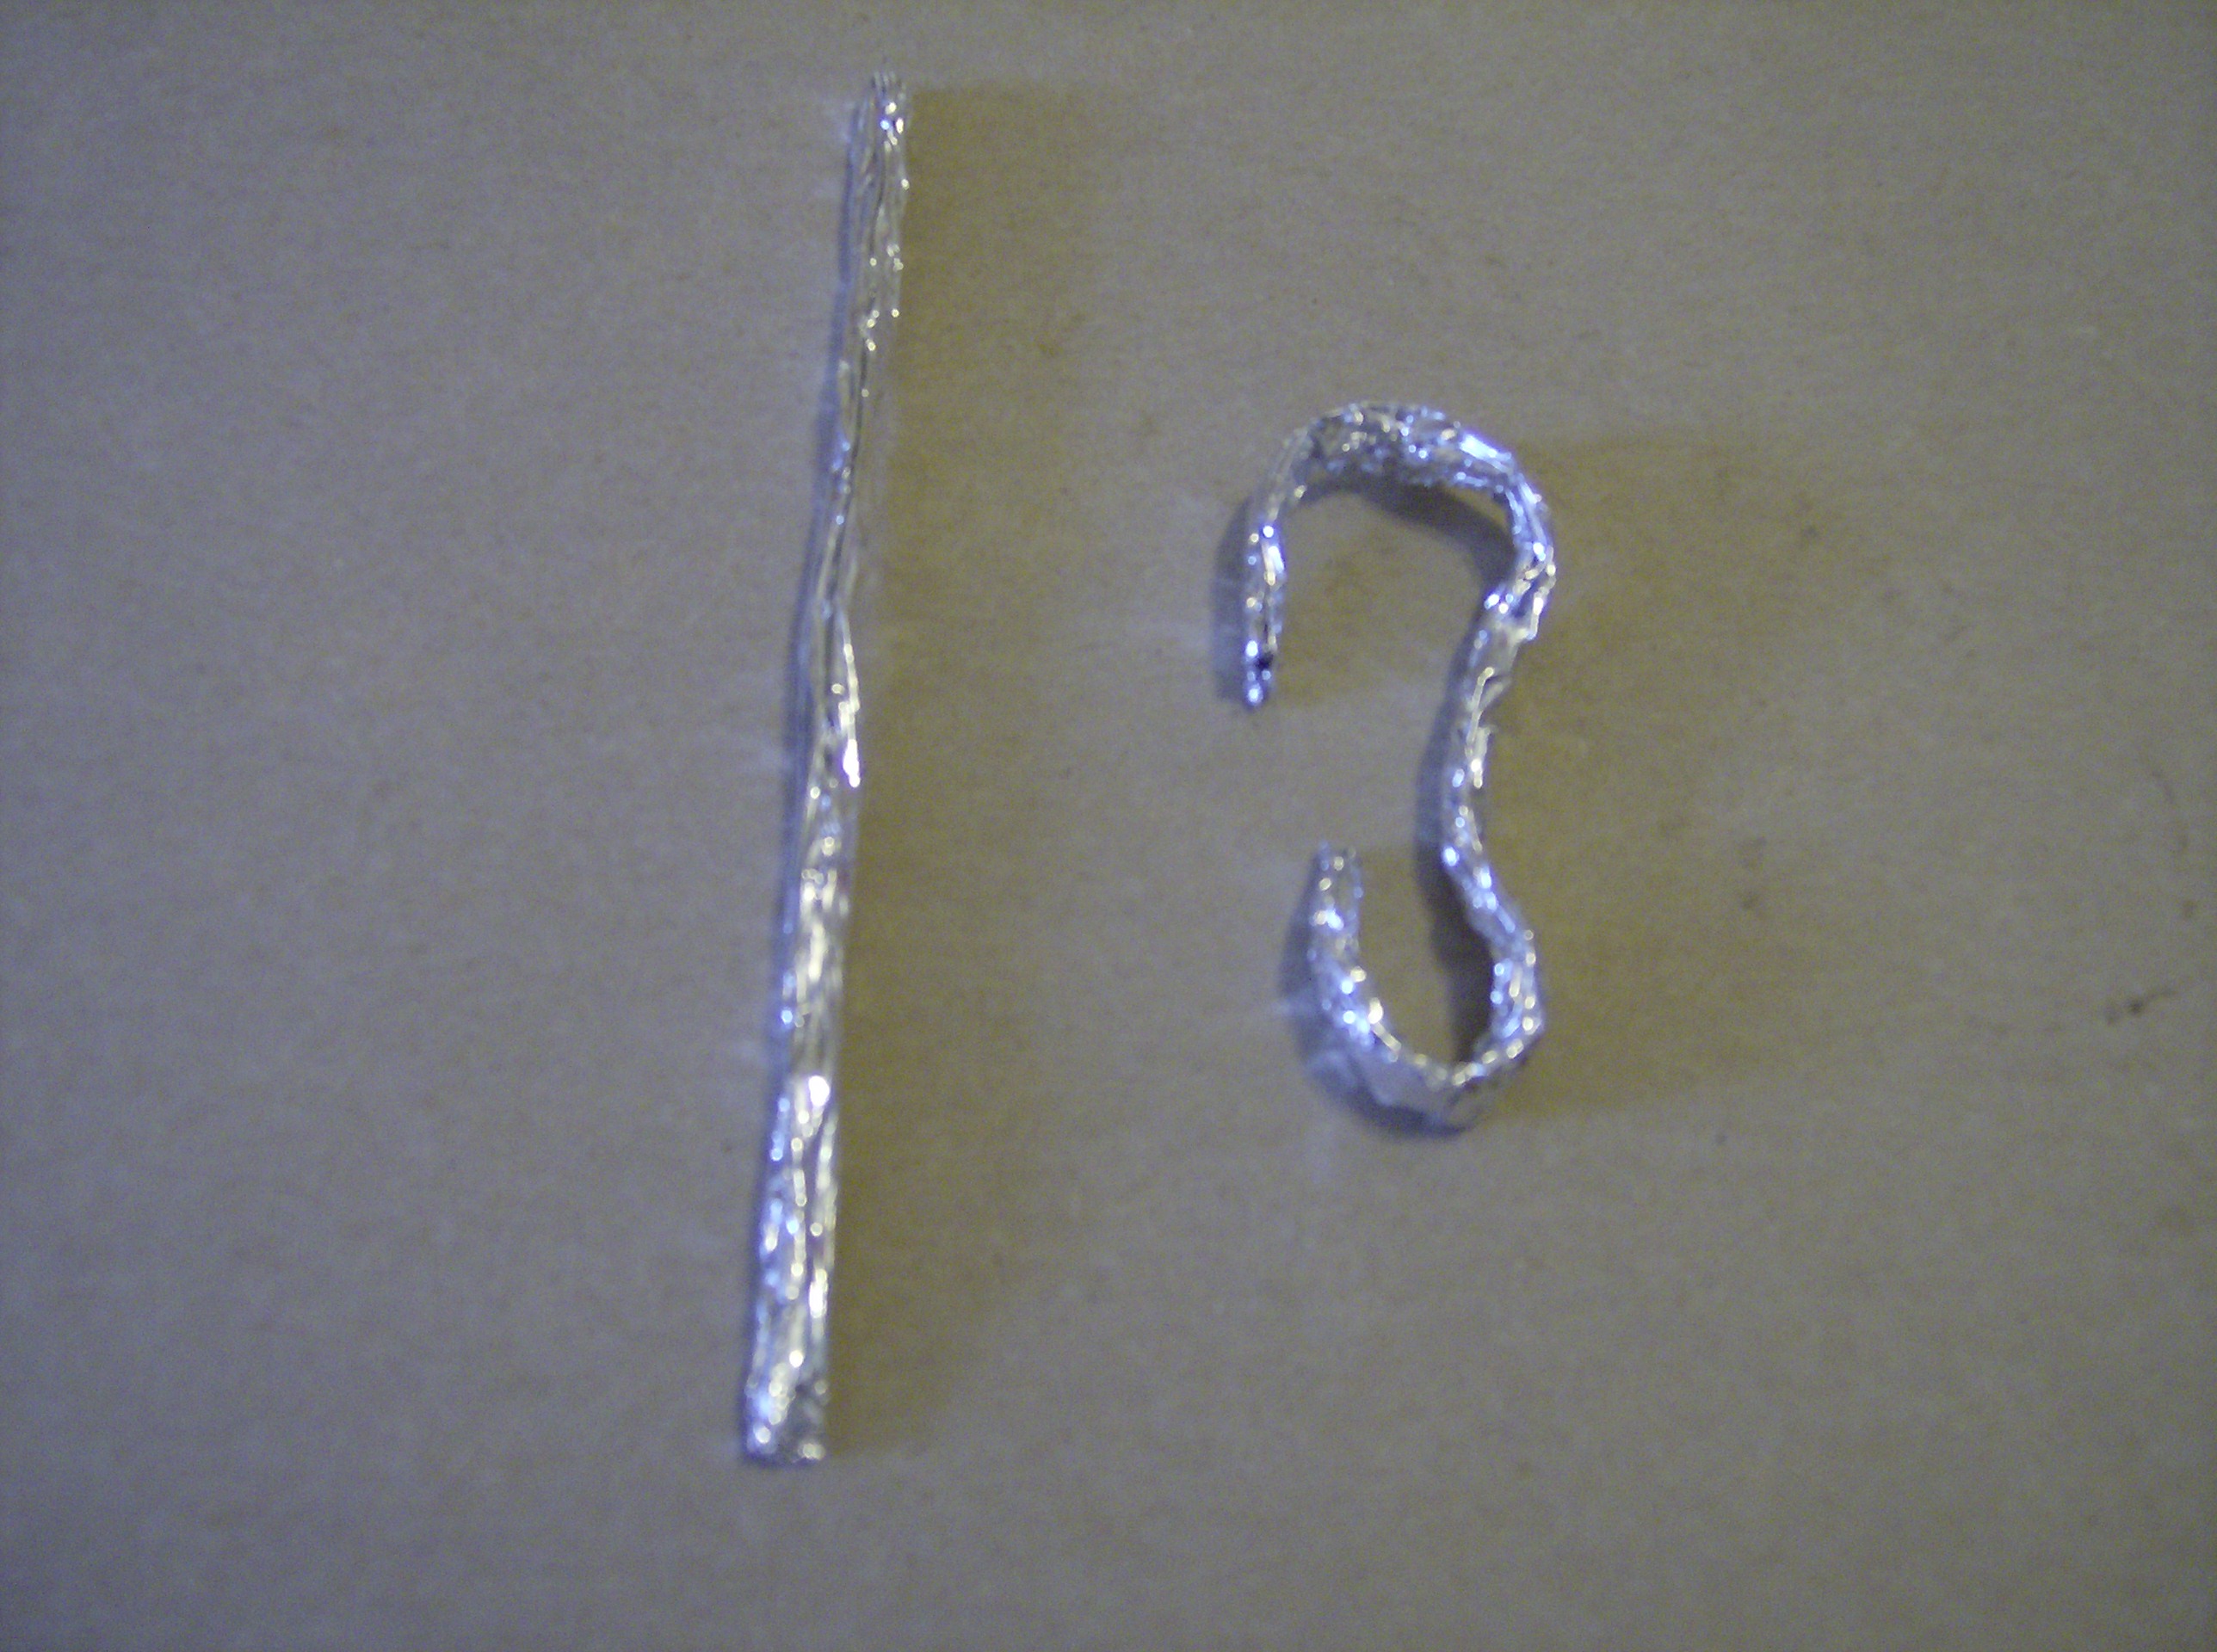
 Next, rip off a 6" sheet of foil and then cut in half to make 2 6"x6" pieces. Roll each one up tightly then, mold into a ear shape(see picture). Now take your hot glue gun and glue the "ear" onto the blucky about where your ear would be on the skull. Next, rip off another small piece of foil and wad up into a small end of nose piece(see picture) and hot glue into the nose. This will give you a more defined facial look, you can leave it out if you wish. If you are planning on adding eyeballs of some kind when your "blucky" is finished, cut out a hole about 2"x2" on the lower back part of the skull. When you have completed this, set the skull aside for later.
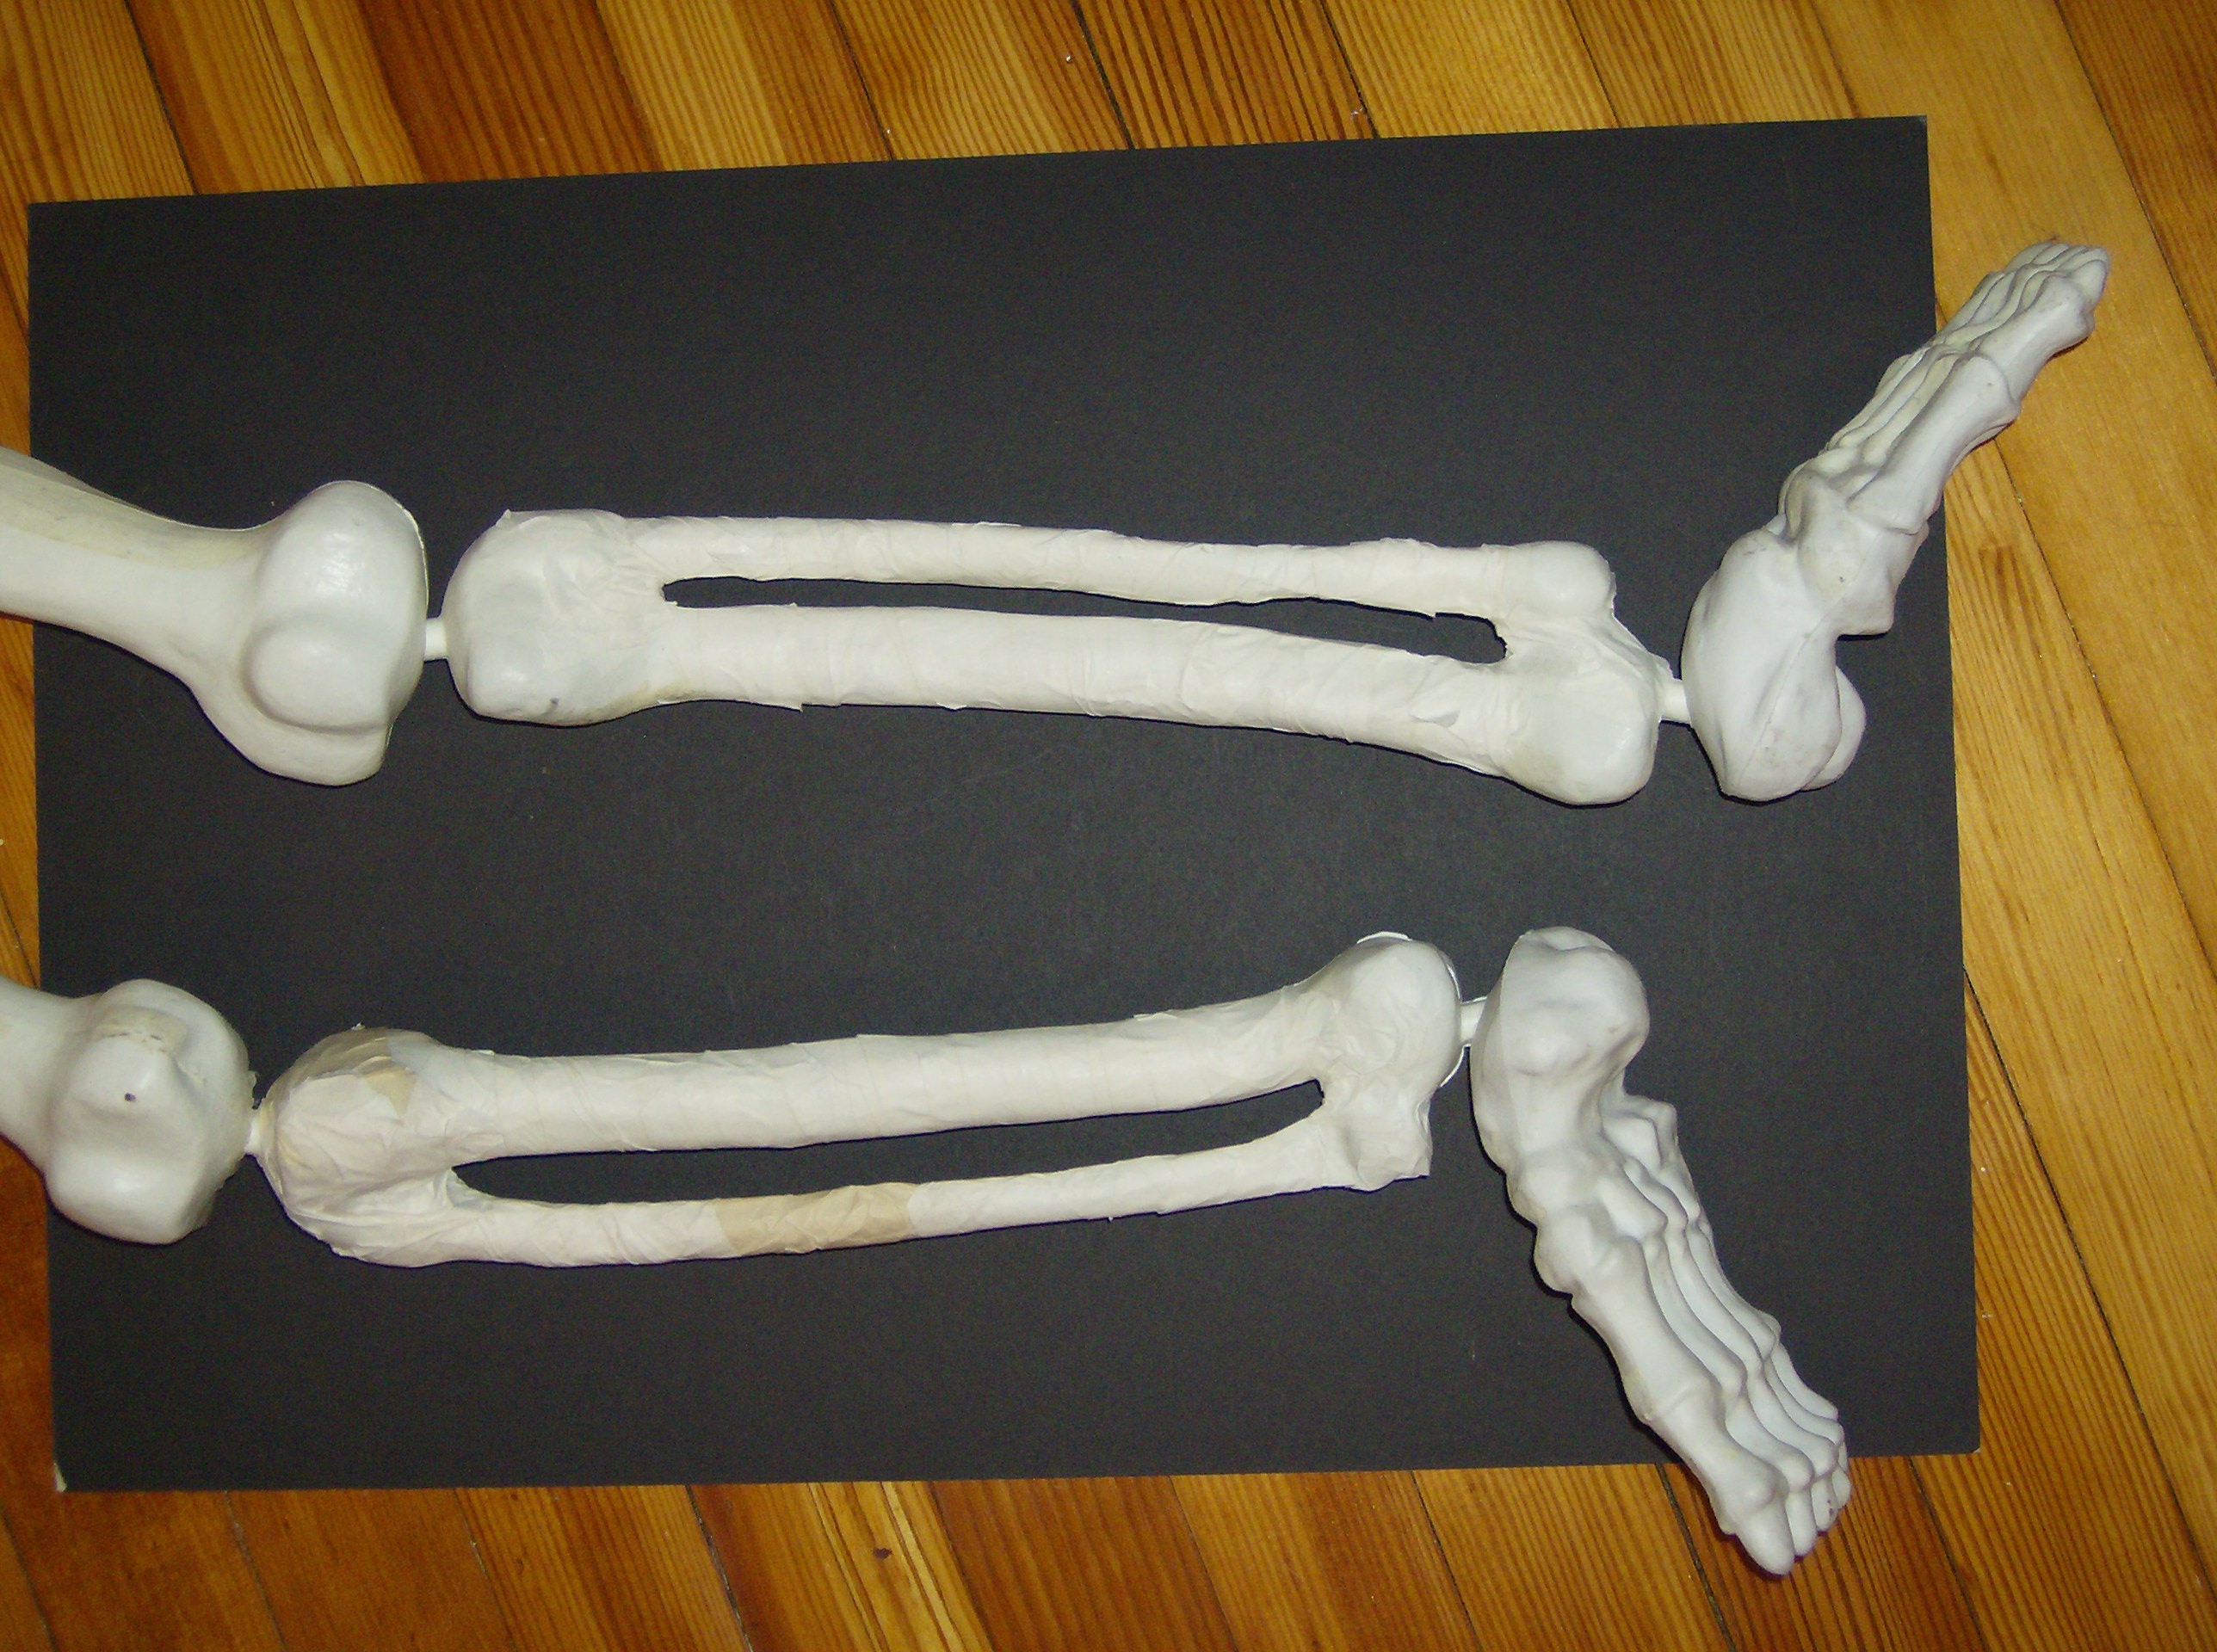 Take off the lower arm bones, hands, the lower leg bones and the feet.
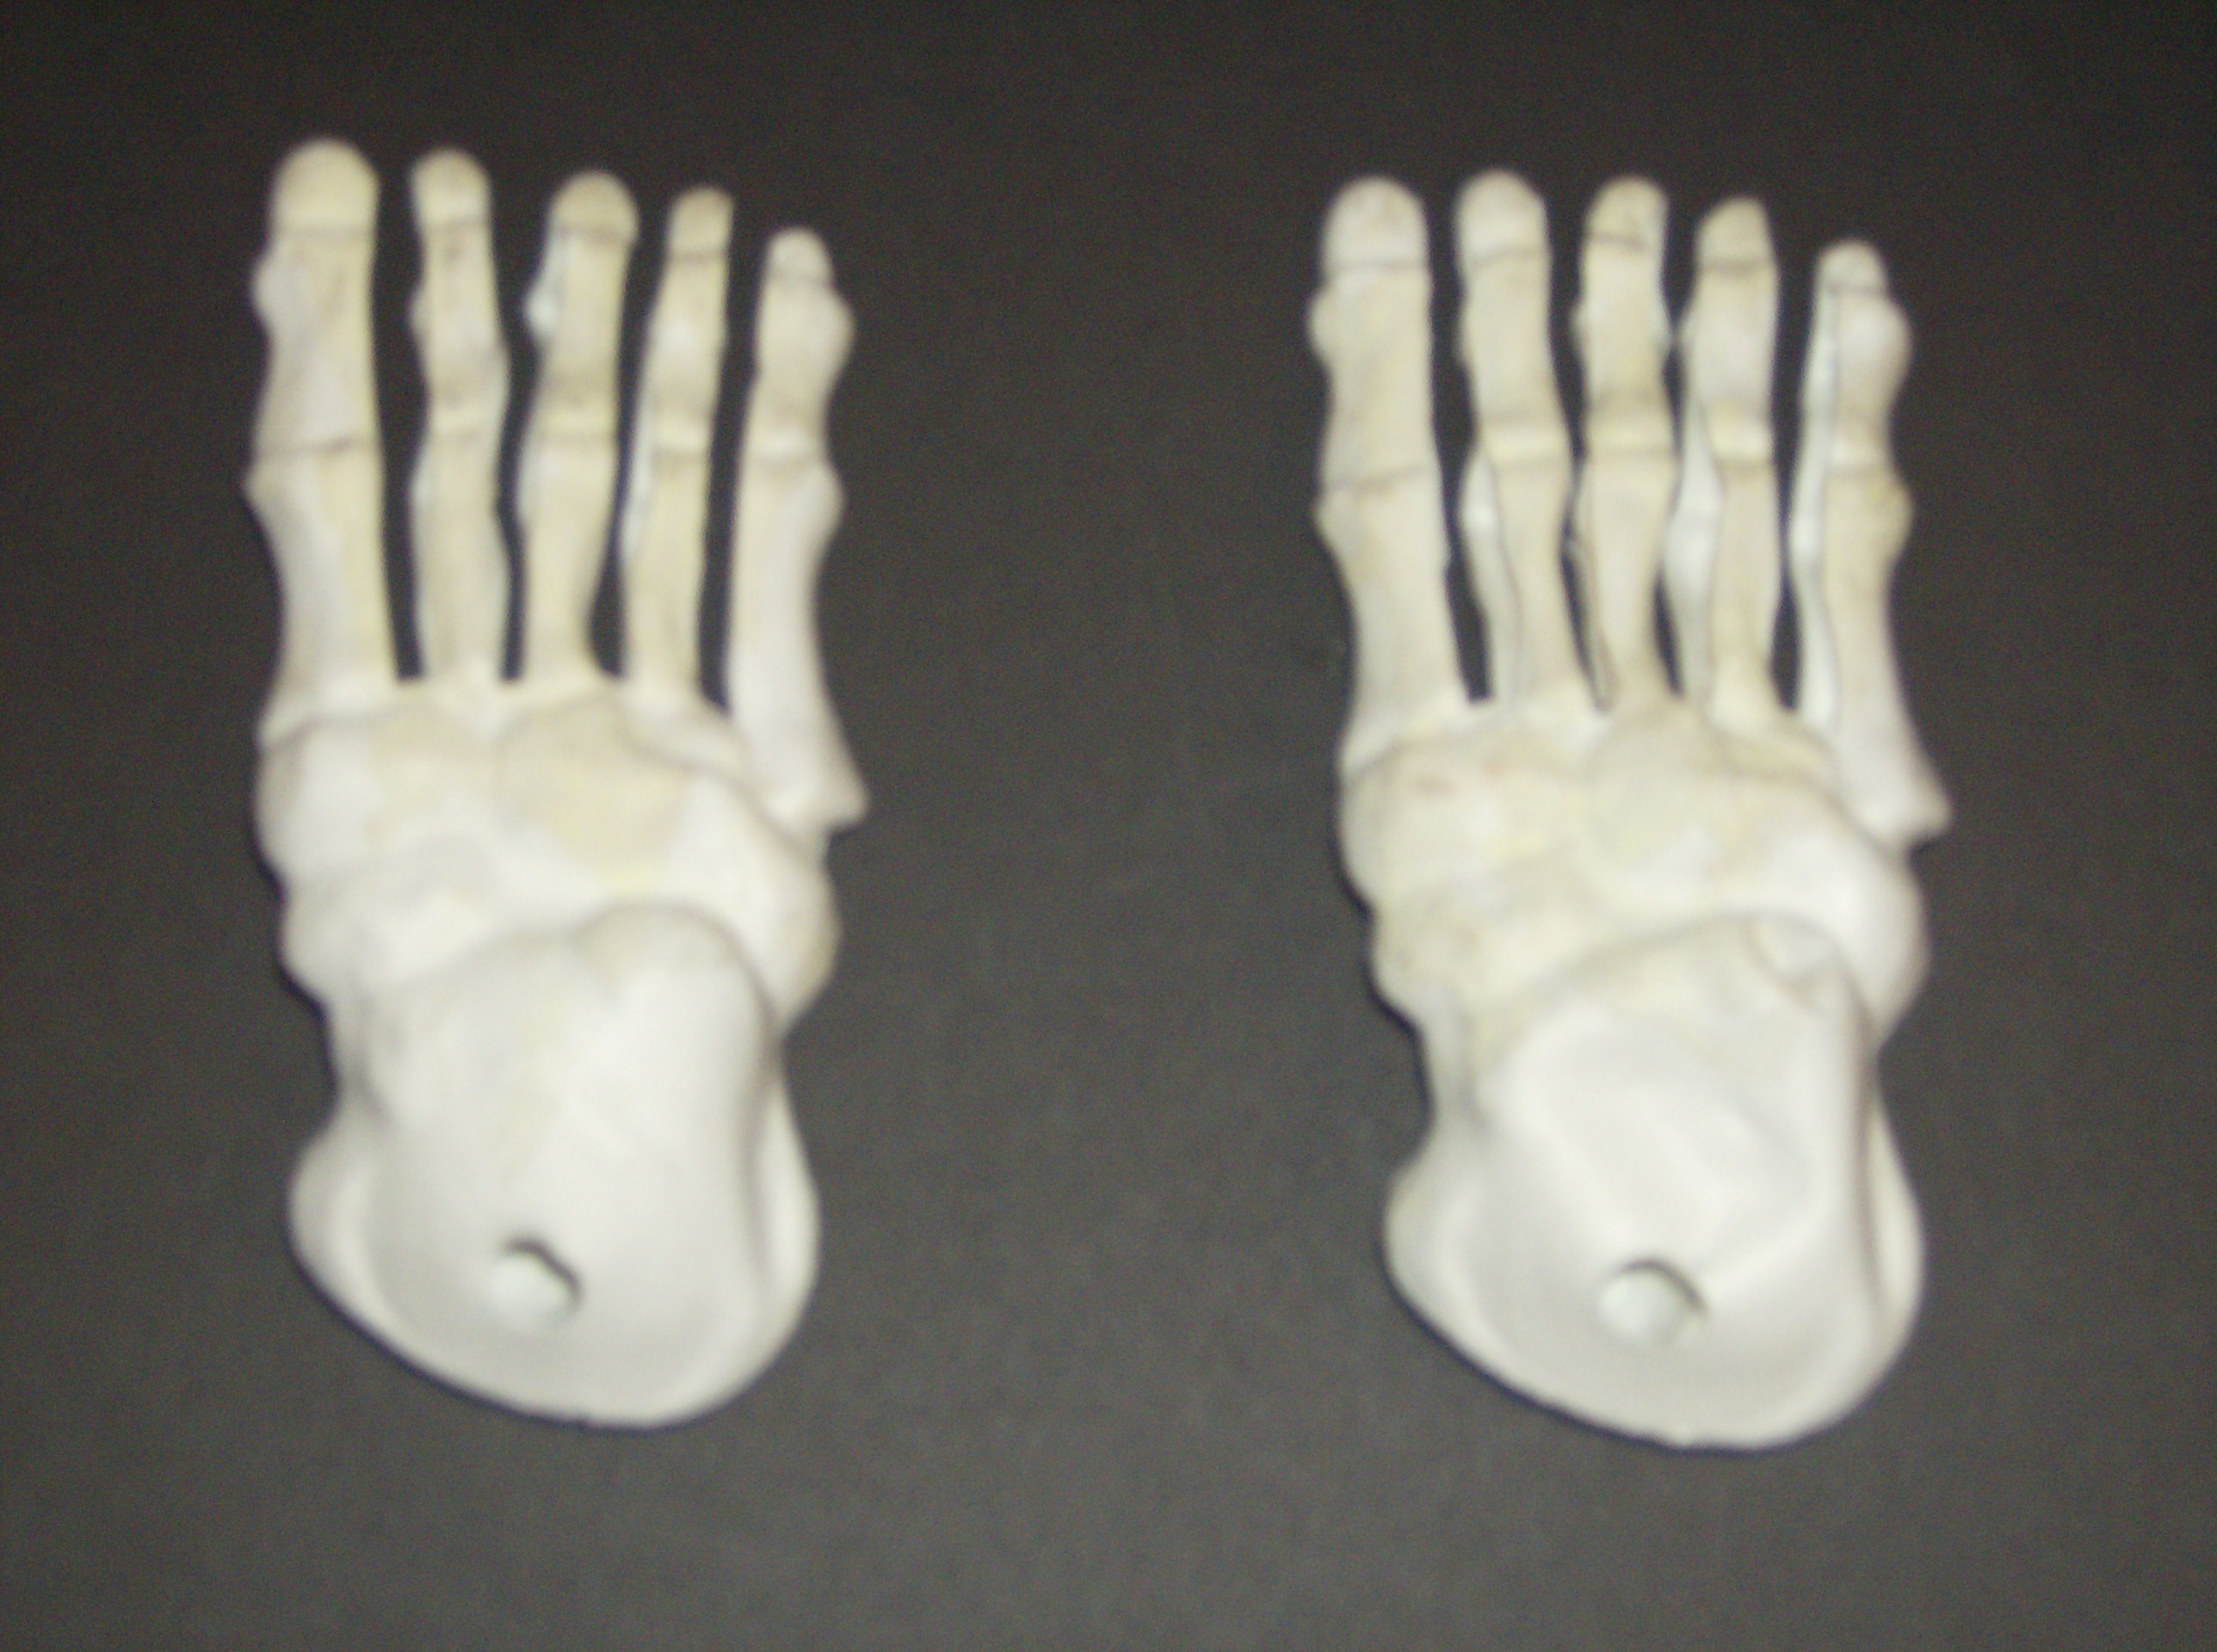
 Now with the hands cut a section out between each finger, don't be afraid to cut out to much remember you want them real thin to look boney, and when we put the "corpsing" on them it will make the fingers thicker. And once again tape up each finger indiviually from the base all the way to the tip. When completed do the same to the feet!
  Pull apart the chest and the pelvic section. Take the chest section and if you would like some bones showing through ripped or fallen off corpsed skin in sections, with the exacto knife cut out sections in between the ribs, very carefully. Now keep in mind you don't have to cut out sections in between each rib only where you want the bones to be seen, this will save you a lot of work! And set aside.
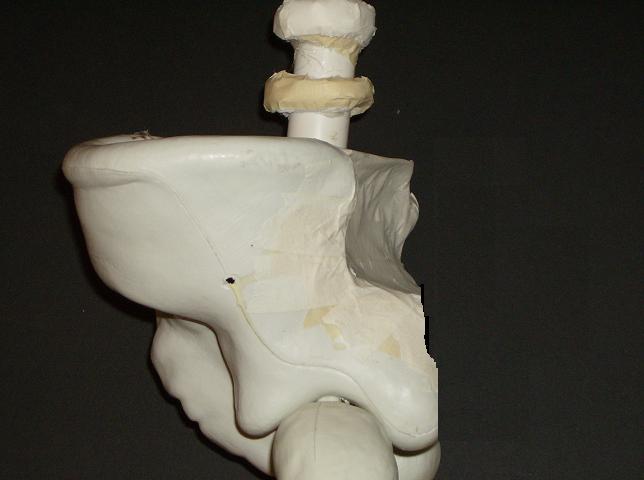
 As for the pelvis, if you hold the piece so you are looking at it from the side, you'll see that the front of it is sticking way out and when your skeleton is assembled together this piece unnaturally sticks out so, cut off the front section (see picture). Now, while we have this section open take the piece of pvc and hold it in the middle of the hole on the top (where the chest section pops into place) with a marker trace around the outside of the pvc. Cut out the circle and then push the pvc into the hole. Take the 3" screw and about a 1/2" from the bottom of the pvc screw it into pvc from one side through the other(so you have equal amount of the screw sticking out from each side) this will prevent the pvc from coming out of the pelvic piece. Take a hot glue gun and put a bead of hot glue around the top and the bottom of the pelvic piece against the pvc and let cool. Take masking tape and cover the open area.